Effortlessly Carve Bone-In Leg of Lamb at Home in 4 Steps
The mere thought of preparing a grand roast for a dinner party can send even seasoned home cooks into a mild panic. And when that roast is a bone-in leg of lamb, with its elegant stature and impressive presentation, the intimidation factor often triples. Many believe that carving such a magnificent piece of meat is a skill reserved for professional chefs or seasoned butchers. But what if we told you that mastering
how to carve leg of lamb – specifically a bone-in leg – is entirely within your reach? It’s true! With a little guidance and the right approach, you can confidently transform a perfectly roasted leg of lamb into exquisite, ready-to-serve slices, making it the undeniable centerpiece of your next gathering.
Forget the anxiety. Serving a succulent leg of lamb isn't just doable; it's a wonderfully rewarding experience. Lamb offers an elegant, impressive main dish that easily rivals a Thanksgiving turkey or an Easter ham in terms of spectacle and flavor. Don't let its seemingly complex nature deter you from enjoying this guest-pleaser. With just a few simple steps, you'll be well on your way to becoming a carving connoisseur. If you're looking for even more ways to refine your technique and truly
Impress Your Guests: Easy Steps to Carve Leg of Lamb, read on!
Why Choose Bone-In Leg of Lamb?
While many recipes might suggest a boneless leg of lamb for ease of preparation and carving, a bone-in cut offers distinct advantages that are worth the minimal extra effort when it comes to carving.
*
Superior Flavor: The bone itself contributes significantly to the lamb's flavor profile as it cooks, imparting a richer, more profound taste to the surrounding meat. This is often described as a deeper, more "lamby" essence that you simply don't get with boneless cuts.
*
Moisture and Tenderness: The bone acts as a heat conductor, helping the meat cook more evenly and retain moisture, resulting in a more tender and juicy roast.
*
Cost-Effective: Generally, bone-in leg of lamb is less expensive per pound than its boneless counterpart, offering a more economical way to feed a crowd without sacrificing quality.
*
Impressive Presentation: There's an undeniable grandeur to presenting a whole, roasted bone-in leg of lamb at the table. It signifies a special occasion and a true culinary effort, even if the carving itself is straightforward.
*
Less Fat: Compared to cuts like a rack of lamb, a leg cut typically has less internal fat, making it a slightly leaner option while still delivering incredible taste.
Essential Tools & Preparation for Carving
Before you even think about picking up your carving knife, a little preparation goes a long way in ensuring a smooth and successful carving experience.
The Importance of Resting
This is perhaps the most crucial step often overlooked. Once your leg of lamb reaches its desired internal temperature (typically 130-135°F for medium-rare), remove it from the oven and transfer it to a clean cutting board. Tent it loosely with foil and let it rest for at least 20-30 minutes, or even up to 45 minutes for a larger roast.
Why is resting so important? As meat cooks, its muscle fibers contract, pushing the delicious juices to the center. Resting allows these fibers to relax and the juices to redistribute evenly throughout the roast. If you cut into the lamb too soon, all those wonderful juices will simply run out onto your cutting board, leaving you with dry meat. Patience here truly pays off!
What You'll Need:
*
A Large, Sturdy Cutting Board: Opt for one with a juice groove to catch any drippings. Stability is key; a board that slides around is a hazard.
*
A Sharp Carving Knife: This is non-negotiable. A sharp, long, thin-bladed knife (8-10 inches is ideal) will make clean, precise cuts. A dull knife will tear the meat, making carving difficult and presentation messy. Consider honing your knife just before you start.
*
A Carving Fork: This tool helps stabilize the lamb as you carve, preventing it from shifting. It also keeps your hands safely away from the blade.
*
A Serving Platter: Have a warm platter ready to transfer the carved slices immediately. This helps maintain the lamb's temperature.
*
Optional: A *Manche à Gigot*: This is a traditional French tool, essentially a decorative handle that attaches to the leg bone, making it easier to hold and maneuver the lamb without touching the hot bone directly. While not essential, it adds a touch of elegance and convenience.
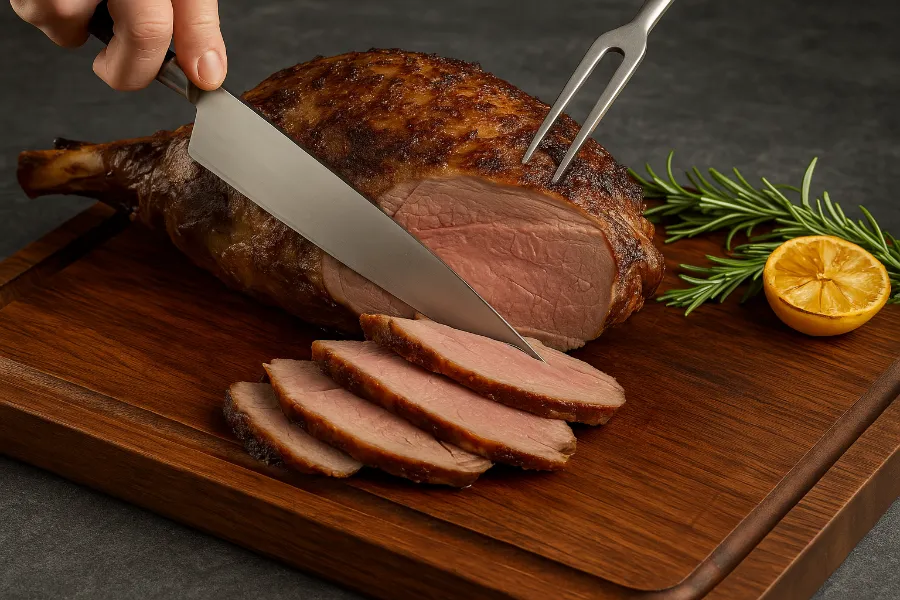
The 4-Step Method: How To Carve Leg Of Lamb
With your perfectly rested lamb and all your tools at hand, you’re ready to begin. This method simplifies the process into four manageable steps, ensuring beautiful, even slices every time.
1. Start Cutting on the Outside (Parallel to the Bone)
Place the entire leg of lamb on its side on your cutting board, with the thickest, rounded part facing up. Using your carving fork to steady the lamb, begin making thin, even slices parallel to the bone. Start from the outer edge, working your way inwards. Aim for slices about ¼ to ½ inch thick, depending on preference. As you reach the bone with your knife, gently guide the slices off and transfer them to your warmed serving platter. Continue until you've carved off a substantial section from this side.
2. Cut Perpendicular to the Bone
Once you've removed a good portion from one side, carefully turn the leg of lamb onto the flat, cut side. This provides a stable base for the next series of cuts. Now, begin slicing the meat perpendicular to the bone. For the first few slices, your knife won't hit the bone. These cuts will yield lovely, uniform pieces. As before, gently transfer these slices to your platter.
3. Slice Above and Along the Bone
As you continue cutting perpendicular to the bone, your knife will eventually encounter the large bone running through the leg. Instead of stopping, continue your slicing motion, angling your knife slightly to run *above* and *along* the bone. Imagine you're trying to separate the meat from the top of the bone with each slice. Continue this motion until you reach the end of the leg, effectively creating a series of slices that are still attached to the bone along its base.
4. Separate Slices From the Bone with a Horizontal Cut
Now for the final, satisfying separation. With all your slices made (and still attached at the bone), make one long, horizontal slice along the top of the bone, underneath all the perpendicular cuts you just made. This single cut will free all the previously made slices from the bone in one elegant motion. Carefully lift and transfer these separated slices to your serving platter.
Once the main portions are carved, don't forget the smaller, often more done pieces around the shank end. These can be cut off in smaller chunks or slices, perfect for those who prefer their lamb a little more well-done, or for a chef's snack!
Pro Tips for a Flawless Presentation and Easy Carving
Beyond the basic steps, a few expert insights can elevate your carving game and ensure your leg of lamb is not only delicious but also visually stunning.
*
Maintain Slice Consistency: Aim for uniformly thick slices. This not only looks professional but also ensures a consistent eating experience for your guests.
*
Keep Slices Warm: As you carve, transfer slices directly to a warmed serving platter. You can keep the platter warm by placing it in a low oven (around 150°F) or over a pot of simmering water.
*
Garnish Thoughtfully: Arrange the carved lamb slices aesthetically on the platter. Garnish with fresh herbs like rosemary or thyme, and don't forget to spoon some of those delicious pan drippings or a complementary sauce over the meat for added flavor and moisture.
*
Safety First: Always use a firm grip with your carving fork and keep your fingers clear of the knife's path. Ensure your cutting board is stable and doesn't slip.
*
Don't Waste a Drop: The flavorful juices collected in your cutting board's groove can be added to your pan drippings or sauce for an extra layer of richness.
*
Practice Makes Perfect: Like any skill, carving improves with practice. Don't be discouraged if your first attempt isn't perfectly symmetrical. Each time, you'll gain more confidence and precision. For a deeper dive into precision and presentation, check out our guide on
Leg of Lamb Carving: Master the Cut for Perfect Presentation.
*
Leftovers are a Gift: If you have any remaining lamb, slice it thinly and store it properly. It's fantastic cold in sandwiches, warm in pitas, or incorporated into salads, stir-fries, or even a shepherd's pie.
Conclusion
Carving a bone-in leg of lamb might seem like a daunting task, but as you've discovered, it's a straightforward process achievable in just four simple steps. By understanding the importance of resting the meat, using the right tools, and following a clear method, you can transform a beautiful roast into an unforgettable meal with grace and confidence. So, next time you're planning a special occasion, don't shy away from this magnificent cut. Embrace the challenge, impress your guests, and savor the rich, delicious rewards of a perfectly carved leg of lamb. Happy carving!